
A single overnight storm can undo weeks of framing work. When rain drenches your subfloor before the roof goes up, the clock on moisture damage starts ticking immediately, and off-grid builders without heaters, dehumidifiers, or quick material deliveries face a narrower margin for error than crews on serviced lots. Moisture control for off-grid builds is not a side task; it is the difference between a stable home and a hidden mold problem.
In a video posted to TikTok by Nate Petroski (@natepetroski), the off-grid content creator captured a frustrating but instructive moment after the subfloor had just been installed when heavy rain moved through before the structure was fully protected. The clip was labeled as the sixth installment.
Before the storm, the builder had weighed whether to insulate the floor immediately to avoid having to crawl underneath and do it later. “You really want to insulate before you put your flooring on, cause it’s so much easier,” Petroski explained.
Watch
In a video posted to TikTok by Nate Petroski (@natepetroski), the off-grid content creator captured the instructive moment, as the rain poured in.
Before the storm, the builder had weighed whether to insulate the floor immediately to avoid having to crawl underneath and do it later. “You really want to insulate before you put your flooring on, cause it’s so much easier,” Petroski explained.
Key Takeaways
- A rain-soaked subfloor must dry below roughly 16-19% moisture content before framing is enclosed, and below about 12% before wood flooring goes down.[8][13][15]
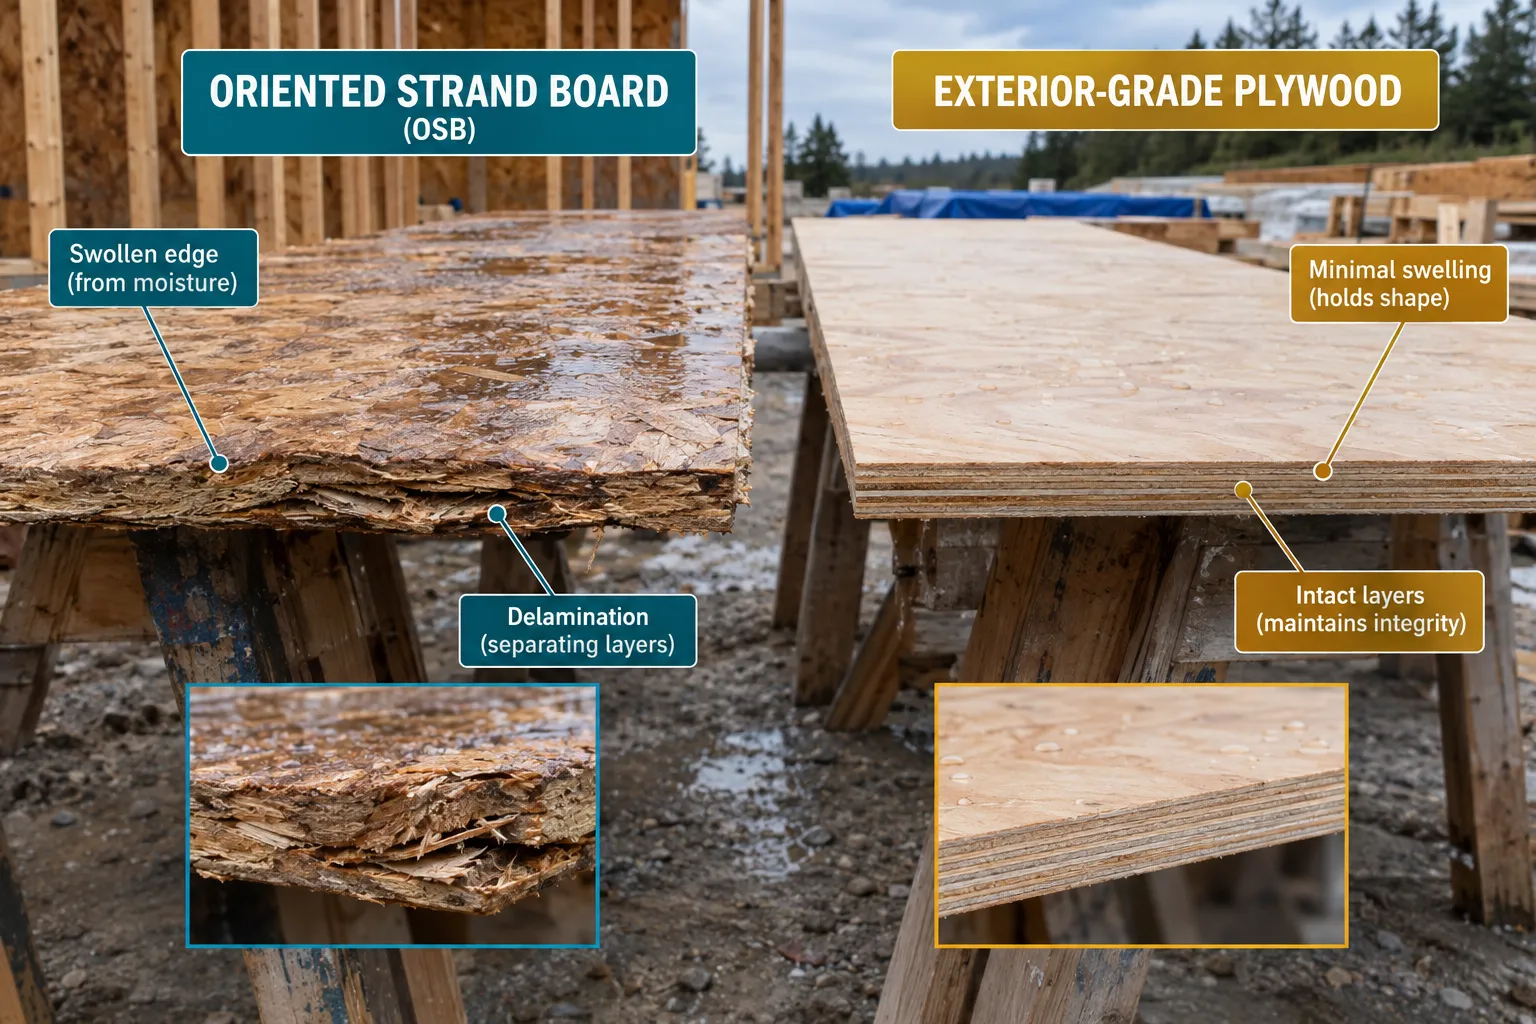
- Exterior-grade plywood generally tolerates direct rain exposure better than standard OSB, which swells at the edges faster when saturated.[3]
- Drying requires open airflow, not sealed insulation; enclosing a wet floor cavity too soon traps moisture inside framing and sheathing.[2][4]
- Every new rain event resets the drying clock, so moisture checks must reference the most recent storm, not the original build date.[10]
- Tarping, drainage channels, and vapor barriers reduce the odds of a repeat soaking, but field fixes matter when wind tears a tarp loose mid-storm.
A Storm Hit Before the Roof Went On
Autumn storm season is unforgiving for anyone framing a cabin in stages. In an October 2026 case highlighted by The Cool Down, an off-grid builder had freshly installed subfloor panels drenched by an unexpected downpour before the roof was framed.[2] Rather than rushing to close up the structure, the builder chose to leave the assembly open to outdoor air, letting moving wind dry the framing and decking before any insulation went in.[2] The reasoning was direct: sealing a wet floor cavity too early risks trapping moisture inside the insulation and subfloor, setting up conditions for rot and mold that can fester for months in a building with no active HVAC.[2]
That decision reflects a broader industry consensus. Guidance on moisture-resistant subfloors treats “construction rain” as its own hazard category, separate from groundwater or plumbing leaks, and recommends a clear sequence: stop further water intrusion, assess how far the wetting spread, expose the affected layers, promote active drying, measure moisture content, and only then move toward closing the assembly.[1]
OSB vs Plywood: Which Handles a Soaked Subfloor Better
Not all sheet goods respond to rain the same way. Oriented strand board is made of compressed wood strands and adhesive, and once saturated, it tends to swell fastest at panel edges, sometimes permanently, even after drying.[3] Exterior-grade plywood, built from solid wood veneer layers with waterproof glue, generally resists swelling and delamination better under the same direct exposure, though it is not immune to damage from standing water.[3]
Builders inspecting a rain-hit subfloor should check for:
- Visible swelling or raised seams, especially along panel edges
- Soft or spongy spots that signal internal delamination
- Discoloration, staining, or an earthy odor suggesting early mold growth
- Edge damage where water pooled longest
Panels that have lost structural rigidity after wetting should be rejected and replaced rather than patched, since compromised sheet goods will not support finish flooring loads safely over time.[3]
Drying Protocols: Airflow, Weep Holes, and Moisture Meter Thresholds
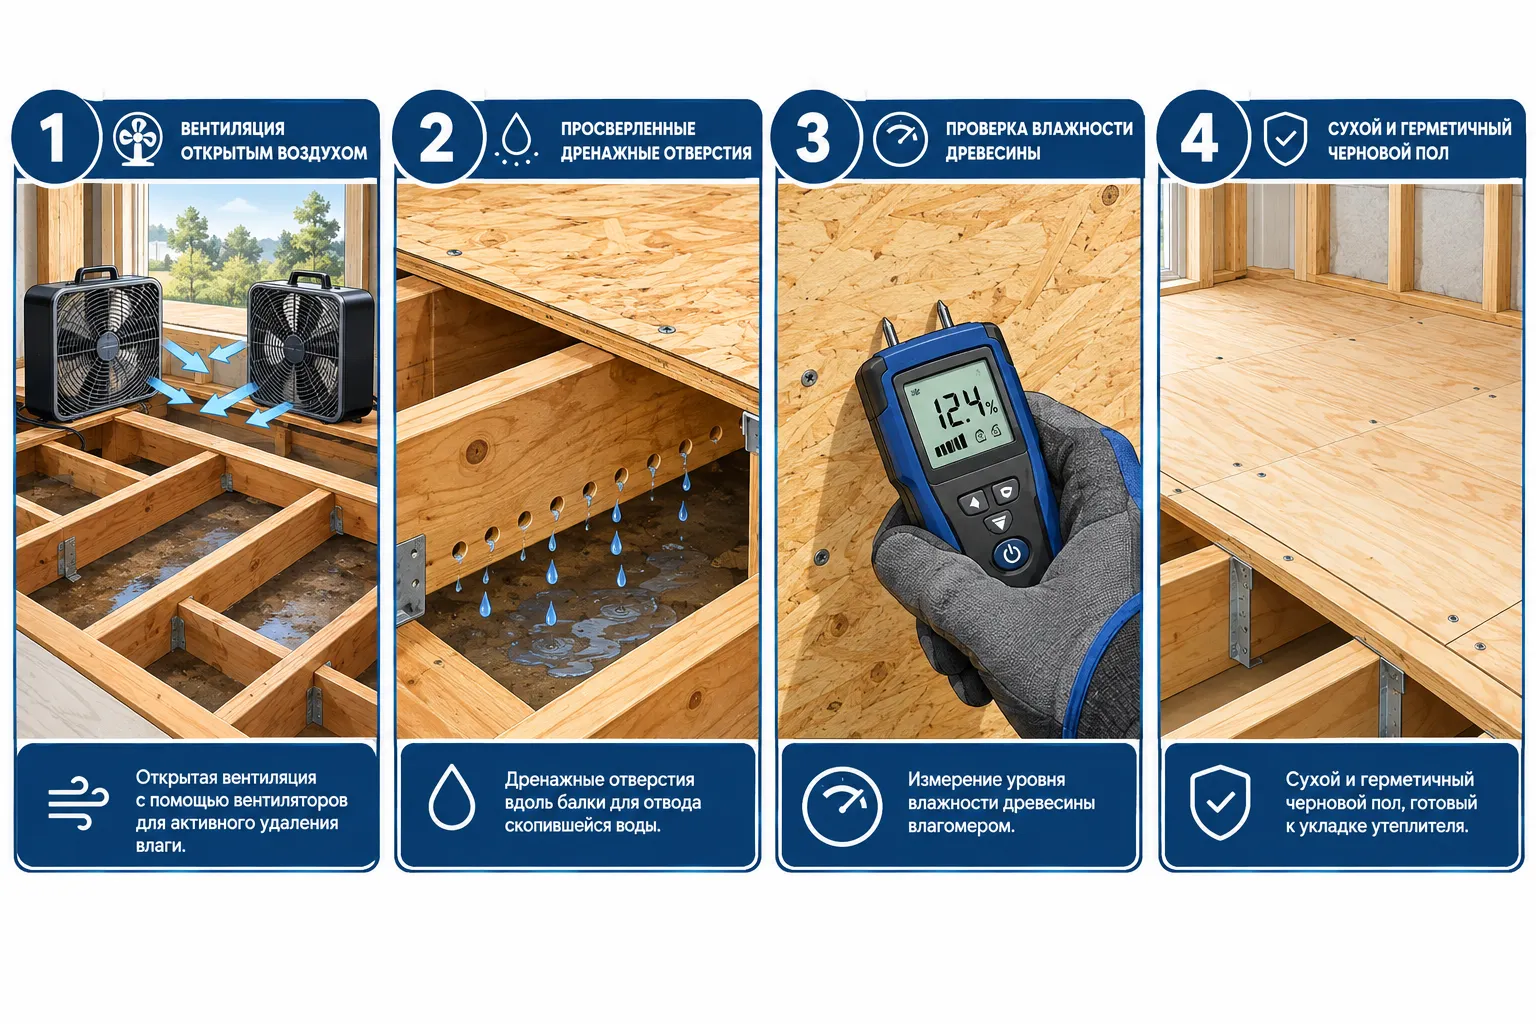
Visual inspection alone cannot confirm dryness. A moisture meter is the standard tool for verifying that a subfloor has recovered enough to proceed. Framing and subfloor moisture content generally needs to drop into the 16-19% range before the structure is enclosed, and wood subfloor moisture should fall closer to 12% before wood flooring, carpet, or tile underlayment is installed.[8][13][15] Because drying time restarts after every wetting event, builders should date their measurements from the most recent rain, not the original installation day.[10]
Practical drying steps include:
- Removing standing water immediately with pumps, squeegees, or absorbent materials
- Opening the structure to cross-ventilation using box fans positioned to push air along, not just across, the floor plane
- Drilling small weep holes at low points in framing cavities to let trapped water escape, while avoiding holes in bottom plates, since that can pull moist subfloor air into wall cavities instead of out of them[4]
- Re-testing moisture content every 24 to 48 hours until readings stabilize at target levels
A technical bulletin on construction moisture warns that framing members and bottom plates can wick water upward from a soaked floor, meaning drying efforts must address the whole assembly, not just the top surface of the panel.[4]
Preventing the Next Disaster: Site Management Tactics
Prevention is cheaper than remediation, especially for remote builds without easy access to replacement sheet goods. Temporary tarping remains the first line of defense, but wind-torn tarps are a common field failure. Securing tarps with lumber battens rather than just rope, overlapping seams downhill, and adding sandbags at the perimeter reduces blow-off risk during gusty storms.
Other site tactics worth building into the schedule:
- Grading temporary drainage channels around the foundation to carry runoff away from exposed framing
- Using a 6-mil polyethylene vapor barrier with seams overlapped at least 6 inches and sealed with waterproof tape once the floor is confirmed dry[15]
- Acclimating replacement subfloor panels at 65-75°F for 48 to 72 hours before installation[15]
- Avoiding the temptation to add an impermeable barrier directly over a still-damp wood subfloor, since trapped moisture beneath such a layer can drive rot even faster than open exposure[6]
For raised floors in humid climates, insulation installed too early beneath a still-wet subfloor can trap moisture against the wood, increasing decay risk later even if the surface looks dry.[12]
Rain-soaked subfloors are a predictable hazard of off-grid construction, not a rare accident. The builders who come through it without long-term damage are the ones who resist the urge to rush enclosure, verify dryness with a moisture meter instead of a guess, and rebuild drainage and tarping systems before the next storm front arrives. Moisture control for off-grid builds succeeds on patience and verification, not speed. Before covering any rain-hit subfloor, confirm moisture readings meet target thresholds, inspect panels for swelling or softness, and only then proceed to insulation and finish flooring.
References
[1] Moisture Resistant Subfloor – https://www.hfiflooring.com/articles/moisture-resistant-subfloor [2] Off Grid Builder Installs Subfloor Storm Soaks – https://www.thecooldown.com/green-home/off-grid-builder-installs-subfloor-storm-soaks/ [3] Subfloor Installation – https://www.buildworkspro.com/articles/subfloor-installation [4] Bu587 Dealing With Construction Moisture – https://d39d3mj7qio96p.cloudfront.net/media/documents/BU587-Dealing-with-construction-moisture.pdf [6] Subfloor Moisture Barrier – https://www.architecture-news.com/articles/subfloor-moisture-barrier [8] Nwfa Installation Guidelines – https://nwfa.org/wp-content/uploads/2026/02/NWFA-Installation-Guidelines.pdf [10] Dtb040.001 Subfloor Preparation Sources Of Moisture – https://dunloptrade.com.au/pdf/technical%20bulletins/floor%20levelling/DTB040.001_Subfloor_Preparation_Sources_Of_Moisture.pdf [12] Moisture Mitigation – https://www.wagnermeters.com/concrete-moisture-test/concrete-info/moisture-mitigation/ [13] Nwfa Installation Guidelines – https://nwfa.org/wp-content/uploads/2026/02/NWFA-Installation-Guidelines.pdf [15] Moisture Mitigation – https://www.wagnermeters.com/concrete-moisture-test/concrete-info/moisture-mitigation/